My dream RaspberryPi project that I am slowly chipping away at is to create the ultimate alarm clock. It is a slow burner though as at it's inception I had none of the skills I needed to pull it off.
I've now amassed all of the technical skills to pull it off and I'm just left with finalising the design and finding the time and the parts (not a lot then!).
An interim project along the way is whipping together the first prototype of the time display re-using some of the parts from an old Arduino project.
What you need
Pretty easy, you don't not a lot is required, obviously you'll need a:
- OLED display
There is a range of available units in different colours and with different pin-outs. This tutorial is based on these are the instructions for the four pin variety - vin, sda, scl & gnd.
Some have five or more including rst but they'll require different libraries to the ones we'll be using here so I wouldn't go for one of those. Just head over to ebay and search for 'oled i2c' and for between £2 and £7 you'll be in business. I'd go for one with the header pins already soldiered for you as if you haven't got a soldering iron it will be a massive inconvenience.
You will also need either:
- a bread board and 4 male/female breadboard wires;
- or 4 female/female breadboard wires.
Install the software
First up we'll update you RaspberryPi with the required packages, hopefully you are familiar with either the terminal window or SSH, I won't go through them here we will just crack straight on with it
we'll be downloading packages to download projects from Github, Python and I2C:
sudo apt-get install git-core
sudo apt-get install python python-dev python-setuptools
sudo easy_install Pillow
sudo apt-get install python3 python3-dev python3-setuptools
sudo easy_install3 Pillow
sudo apt-get install python-imaging python-smbus i2c-tools
I've included both Python 2 & 3 here but you only really need one of them if you are short on space.
Libraries
Here we are going to create a folder in you'r home directory and download the python libraries we'll need to operate the display, these are the main display calls, a funky font which looks just like an LCD display and some code so we can run the scripts in the background as a system service (as I describe in this tutorial)
cd ~
mkdir oled
cd oled
git clone https://github.com/BLavery/lib_oled96.git
git clone https://github.com/keshikan/DSEG.git
git clone https://github.com/metachris/python-posix-daemon.git
git clone https://github.com/mc3k/OLED-Clock.git
cp
Wire up the pi
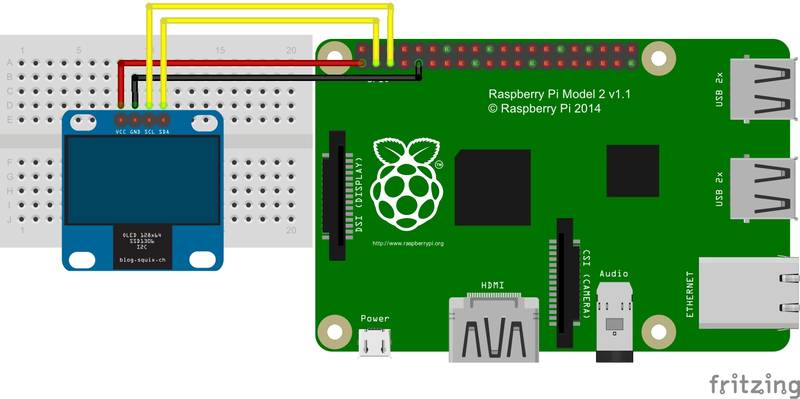
Probably the most daunting bit, but in the big scheme of GPIO this is about as simple as it gets - just refer to the
Obviously the usual disclaimer applies - if you electrocute yourself, blow up you RPI or burn your house down - don't come to me with your law suit; you need consult a someone who is fully trained up in electronics to guide you through it if you are unsure about any aspect of what you are doing regardless of what I've written!
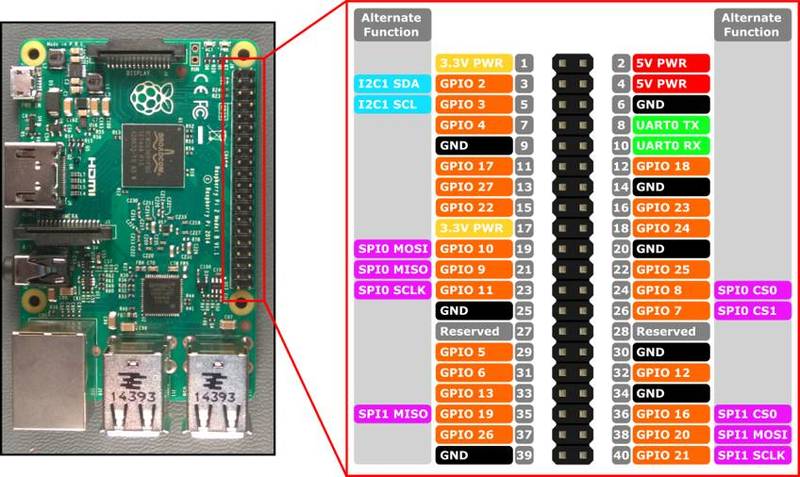
Legalities out of the way, you just need to connect the four pins of your display to their corresponding pins on the pi - consult the header labels on your OLED with the pinout diagram. It is pretty straightforward in this case as they are all grouped together at the end of the header. The VCC pin can usually be connected to either 3.3v of 5v in the case of this component but check your specs to make sure.
Wiring diagram
Pinout diagram
For the RPI2 & 3, if you have a different version consult the relevant diagram for your model.
After you have checked and
Finalise the Pi setup
sudo raspi-config
and enable i2c in the advanced menu, then reboot and see if we can detect the screen:
sudo reboot
sudo i2cdetect -y 1
after the last command you will get a readout telling you that your pi has picked up your display:
     0  1  2  3  4  5  6  7  8  9  a  b  c  d  e  f
00:          -- -- -- -- -- -- -- -- -- -- -- -- --
10: -- -- -- -- -- -- -- -- -- -- -- -- -- -- -- --
20: -- -- -- -- -- -- -- -- -- -- -- -- -- -- -- --
30: -- -- -- -- -- -- -- -- -- -- -- -- 3c -- -- --
40: -- -- -- -- -- -- -- -- -- -- -- -- -- -- -- --
50: -- -- -- -- -- -- -- -- -- -- -- -- -- -- -- --
60: -- -- -- -- -- -- -- -- -- -- -- -- -- -- -- --
70: -- -- -- -- -- -- -- --
You can see mine here popping up a 3c
Lets start the coding
So now we've got all the pre-requisites out of the way we can get on with firing up the display and getting coding. The way we'll go about it is to grab the various files we need from the libraries and copy them into the working directory.
I'm doing it this way to keep it simple as there's an overwelming amount of files knocking about in the subfolders.
First up is the OLED library and some bare bones code to get us started
cd /home/pi/oled
cp lib_oled96/lib_oled96.py .
cp OLED-Clock/python/clock-min.py .
then we can fire the script up to see if it works
python clock-min.py
hopefully you should be seeing the display pumping out the time and date along with a the time scrolling up on the command prompt. Jobs a good-un.
To cancel just hit ctrl+c.
If you want to have a look at the code just use the following command:
nano clock-min.py
Next up is a more fancy looking script:
cp lib_oled96/FreeSans.ttf .
cp OLED_Clock/python/clock.py .
python clock.py
The third is has a more traditional look of an LCD clock, this one also only updates once a minute instead of once per second - I've not test the performance overhead of these script but it may have less overhead:
cp DSEG/fonts/DSEG7-Modern/DSEG7Modern-Bold.ttf .
cp OLED-Clock/python/clock-dseg.py .
python clock-dseg.py .
Running as a background service
As good as these scripts are they are pretty useless in their current state as they tie up the terminal/SSH session stopping you working and quitting the python job if you exit them. So what we need is to run them as a background service, fortunately this is pretty easy when you know how, first off copy the files:
cp python-posix-daemon/src/daemon2x.py .
cp OLED-Clock/python/clock-dseg-d.py .
cp OLED-Clock/python/clock-d.py .
We can start and stop the clock with these commands:
python clock-d.py start
python clock-d.py stop

python clock-dseg-d.py start
python clock-dseg-d.py stop
As you see you it doesn't hog the bash prompt and you can even quit your terminal / SSH session.
Starting at boot
if you want to run the script at boot you'll need to
sudo nano /etc/rc.local
then type in
# Start the OLED Clock
if [ 'i2cdetect -y 1 | grep 3c' ];  then
        echo "Starting python logging daemon\\\\\\\\\\\\\\\\\\\\\\\\\\\\\\\\n"
        sudo python /home/pi/oled/clock-d.py start;
else
        echo "no";
fi;
Further reading
there are some bits of code to embelish your project here adding the ability to display a various number of different system parameters, I've programmed a number of them here:
OLED-Clock/system.py

